

Xposed is a very handy hooking framework for Android. I used it myself to build AppContext. Although Xposed’s modding popularity has waned somewhat since its peak in 2018, it is still very useful for reverse engineering Android apps. If you want to do that at scale, it’s very convenient to be able to use emulators. How to install Xposed on a rooted Android device is well known, but installing it on the Android emulator not so much. It’s actually pretty easy, and I’ll explain how to do it in this post.
Note that this is about the official version of Xposed, which supports up to Android 8.1. I’ll discuss installing the more modern EdXposed fork on an emulator in a later post, because for that we’ll also need to get Magisk up and running.
A good preparation
So, the very first thing you need to do is make sure you have access to AVD tools. The best way to do so is to install Android Studio. Open up the device manager, select any device, and then select the Android 8.1 x86 image. This is the last version of Android supported by the official Xposed version. You might be tempted to use an x86_64 image instead, but there’s no Xposed build available for that architecture. Give your emulator a clear name, like xposed-emulator. (You can choose a different name, but you’ll have to make sure to use the correct name in the commands below.) Don’t start your emulator just yet. We’re going to use the command line to do that later.
We’ll also need the Xposed framework itself from here. If you chose an Android 8.1 x86 emulator image, you’ll want to pick sdk27, and then x86. You can then select the latest zip, which at the time of writing is xposed-v90-sdk27-x86-beta3.zip.
Lastly, we need the Xposed Installer APK. This is the Android app used to manage the Xposed framework and any modules you might install. It’s attached to the first post of this thread on XDA-Developers.
Launching the emulator
We’re going to use the emulator command. If it’s not on your PATH, you can find it in the emulator/ folder in your SDK directory.
First, let’s double-check the name of the emulator you created. To do so, run:
Jay@Surface:~$ emulator -list-avds
xposed-emulator
You’ll notice that any spaces and special characters have been replaced by underscores. In the following commands you’ll need to use the name exactly as it was printed by -list-avds.
The Xposed framework needs to be installed on the /system partition, for which said partition needs to be writable. On a regular device, this requires root privileges. Fortunately, on an emulator there’s a built-in way to get /system write access.
To start the emulator with a writable /system partition, run the following command:
Jay@Surface:~$ emulator -avd xposed-emulator -writable-system(Where xposed-emulator is the name of your emulator.)
Wait until the emulator is fully booted up and displaying the home screen before continuing.
Installing the Xposed framework
This might sound weird if you’re used to Android custom recoveries and install zips, but the first step is to unzip the xposed-v90-sdk27-x86-beta3.zip you downloaded. Then name the unzipped folder xposed, for convenience. Now navigate to the xposed/META-INF/com/google/android folder, and locate the flash-script.sh install script. Move this script all the way to the top level, so that it’s at xposed/flash-script.sh. Now drag the xposed folder and drop it on your running emulator. This action will copy the folder to the emulator’s Download folder.
Now we’re going to use ADB to connect to the emulator. If you have Android Studio, you’ll have ADB. You’ll probably need a new terminal window, because the previous one is still running the emulator. Run the following command to launch ADB as root:
$ adb root
restarting adbd as root
Then use this command to open a shell on the emulator:
Jay@Surface:~$ adb shellThe shell should show a # instead of a $ to indicate it is a root shell. In the shell, we can run the install script. First change the working directory to the xposed directory you copied over.
generic_x86:/# cd /sdcard/Download/xposedThen run the install script with this command:
generic_x86:/# sh flash-script.shThe script should finish without errors. If it doesn’t, leave a comment on Twitter with the error message, and I’ll try to help out.
Installing the Xposed Installer app
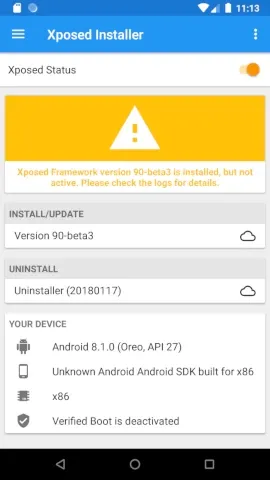
With the framework itself installed, we still need to install the Xposed Installer app to manage it all. To do so, drag the APK file you downloaded and drop it onto your running emulator. After the installation is complete, open the Xposed Installer. You should see this screen, telling you that the framework is installed, but not active:

Finalizing the installation
To activate the framework, we’ll need to reboot the emulator. We’re not going to do a normal reboot, to be safe. First hold your emulator’s power button and select “Power off” to turn off the emulator. You should see the emulator shutting down in the terminal window you used to start it up. When that has finished, restart the emulator with the same command as last time:
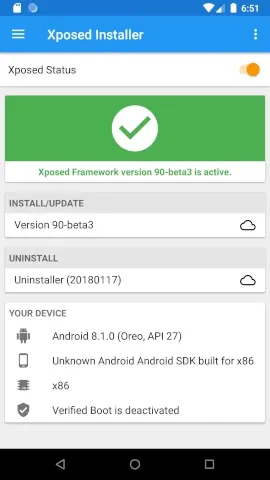
Jay@Surface:~$ emulator -avd xposed-emulator -writable-systemNow when the emulator has booted up, open the Xposed Installer app. It should tell you that the framework is installed successfully:

To be safe, I tend to always start my emulator with the emulator command, passing the -writable-system option. I’m not sure exactly how it happens, but I’ve seen the framework get uninstalled when the emulator is started without this option. (That includes starting the emulator in the Device Manager.)
Installing modules
Xposed modules are installed as regular Android apps. To install one on the emulator, you can either drag the APK file and drop it onto your emulator, or use adb install. After installation, make sure the module is enabled in the Xposed Installer. Lastly, you’ll have to reboot. To be safe, use the method described above. (So, long press the power button to turn it off. Then use the emulator command to turn it on.)
Thanks for reading
I hope this tutorial was helpful, and you succeeded installing Xposed on your emulator. Let me know what you’re using it for by leaving a comment on Twitter. I’m curious.🙂
Stay tuned for the next article in which we’ll install Magisk on an emulator, which opens up the possibility of running EdXposed on newer Android versions!
One more thing…
Do you love newsletters? But hate a cluttered inbox? Then you might like Feedo, which I built to solve this! Feedo takes your newsletters out of your inbox, and presents them in a beautiful feed.
More reasons to love Feedo:- 👀 No algorithm: Feedo presents your newsletters in a chronological feed. There's no AI trying (and failing) to figure out what you want to see.
- 🧠 Smart: Feedo automagically finds the newsletters in your inbox. No need to manually tell it which emails are newsletters (although you can).
- 🤷♀️ Simple: Feedo works with your current email account.